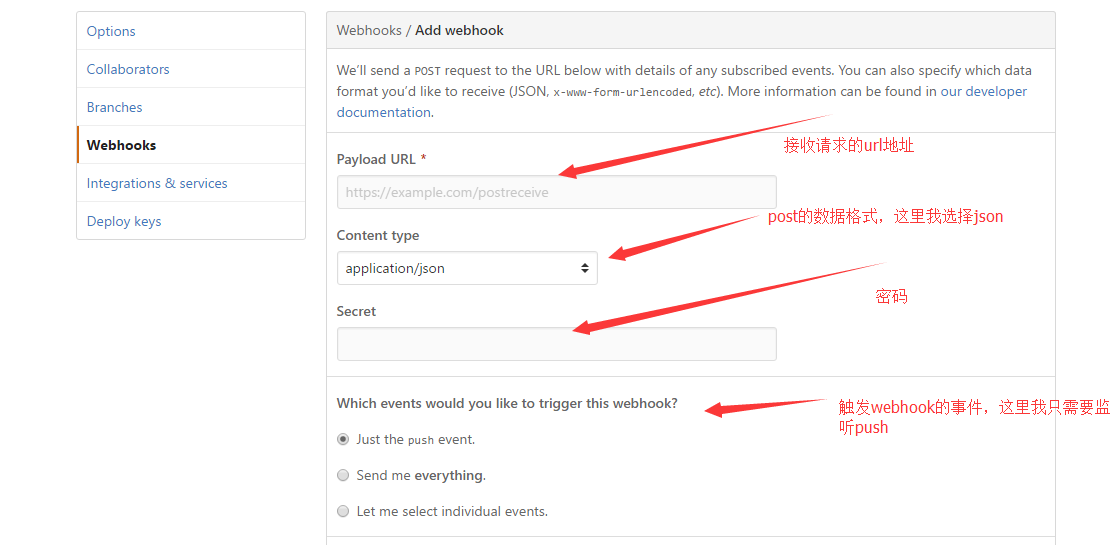
1
2
3
4
5
6
7
8
9
10
11
12
13
14
15
16
17
18
19
20
21
22
23
24
25
26
27
28
29
30
31
32
33
34
35
36
37
38
39
40
41
42
43
44
45
46
47
48
49
50
51
52
53
54
55
56
57
58
59
60
61
62
63
64
65
66
67
68
69
70
71
72
73
74
75
76
77
78
79
80
81
82
83
84
85
86
87
88
89
90
| {
"ref": "refs/heads/master",
"before": "2db041797c019dd3f04b45203ba4ad09ffef2654",
"after": "454cc4e6bfce259cd29fbc112c9b3714e0750ab7",
"created": false,
"deleted": false,
"forced": false,
"base_ref": null,
"compare": "https://github.com/007xiaoxingxing/My_Blog/compare/2db041797c01...454cc4e6bfce",
"commits": [
{
"id": "454cc4e6bfce259cd29fbc112c9b3714e0750ab7",
"tree_id": "09538c4e1f362018d9e230d4de2225ca469fb32a",
"distinct": true,
"message": "PIL grab",
"timestamp": "2016-12-04T10:38:02+08:00",
"url": "https://github.com/007xiaoxingxing/My_Blog/commit/454cc4e6bfce259cd29fbc112c9b3714e0750ab7",
"author": {
"name": "007xiaoxing",
"email": "chanxing9@gmail.com",
"username": "007xiaoxingxing"
},
"committer": {
"name": "007xiaoxing",
"email": "chanxing9@gmail.com",
"username": "007xiaoxingxing"
},
"added": [
"public/2016/12/04/PIL-Grab/index.html",
"public/archives/2016/12/index.html",
"public/tags/PIL/index.html",
"public/tags/python/index.html",
"source/_posts/PIL-Grab.md"
],
"removed": [
],
"modified": [
"db.json",
略去一万字.....
]
}
],
"head_commit": {
"id": "454cc4e6bfce259cd29fbc112c9b3714e0750ab7",
"tree_id": "09538c4e1f362018d9e230d4de2225ca469fb32a",
"distinct": true,
"message": "PIL grab",
"timestamp": "2016-12-04T10:38:02+08:00",
"url": "https://github.com/007xiaoxingxing/My_Blog/commit/454cc4e6bfce259cd29fbc112c9b3714e0750ab7",
"author": {
"name": "007xiaoxing",
"email": "chanxing9@gmail.com",
"username": "007xiaoxingxing"
},
"committer": {
"name": "007xiaoxing",
"email": "chanxing9@gmail.com",
"username": "007xiaoxingxing"
},
"added": [
"public/2016/12/04/PIL-Grab/index.html",
"public/archives/2016/12/index.html",
"public/tags/PIL/index.html",
"public/tags/python/index.html",
"source/_posts/PIL-Grab.md"
],
"removed": [
],
"modified": [
"db.json",
这都不重要,略.....
"public/tags/萌新第一次/index.html"
]
},
"repository": {
"id": 64537807,
"name": "My_Blog",
"full_name": "007xiaoxingxing/My_Blog",
"owner": {
"name": "007xiaoxingxing",
"email": "994983825@qq.com"
},
"private": false,
"html_url": "https://github.com/007xiaoxingxing/My_Blog",
鬼知道这中间少了些什么?滑稽 - -!
"site_admin": false
}
}
|
